Mohak Sethi

@

About Mohak Sethi

Mohak is a content writer and strategist. He has developed content in tech, OTT, and travel niches. When he is not writing, he’s probably daydreaming about getting on a spacecraft and exploring the universe.

Cache Control Headers
Languages, frameworks, tools, and trends

6 Contemporary Designs Using CSS with Code Samples for 2023

Here are 6 CSS designs that you can use to enhance the aesthetics of your website 1. CSS gradient background 2. Parallax CSS designs 3. Responsive CSS designs

A web product’s visual appeal can often make or break it. With the continued support from the community and the enhancement of tools, the aesthetics and functionality of CSS designs have improved substantially. This improvement has benefited many businesses by enhancing user experience and engagement, directly leading to the organization’s commercial health. So how can you make the most of CSS designs? Let’s find out!

In this blog post, we will look into the web designing approach and contemporary designs using CSS with code samples.

Table of Contents:

What are HTML and CSS designs?

HTML (Hyper Text Markup Language) is the infrastructure of the web page, which includes different elements with unique “ids” and “classes,” and CSS, which stands for Cascading Style Sheets, is the construction of the individual elements. Both are vital for developing web interfaces. 

Multiple types of web designs can be created using HTML and CSS.

Also, read: What Is Tailwind CSS? What Is New in Tailwind CSS V3.0?
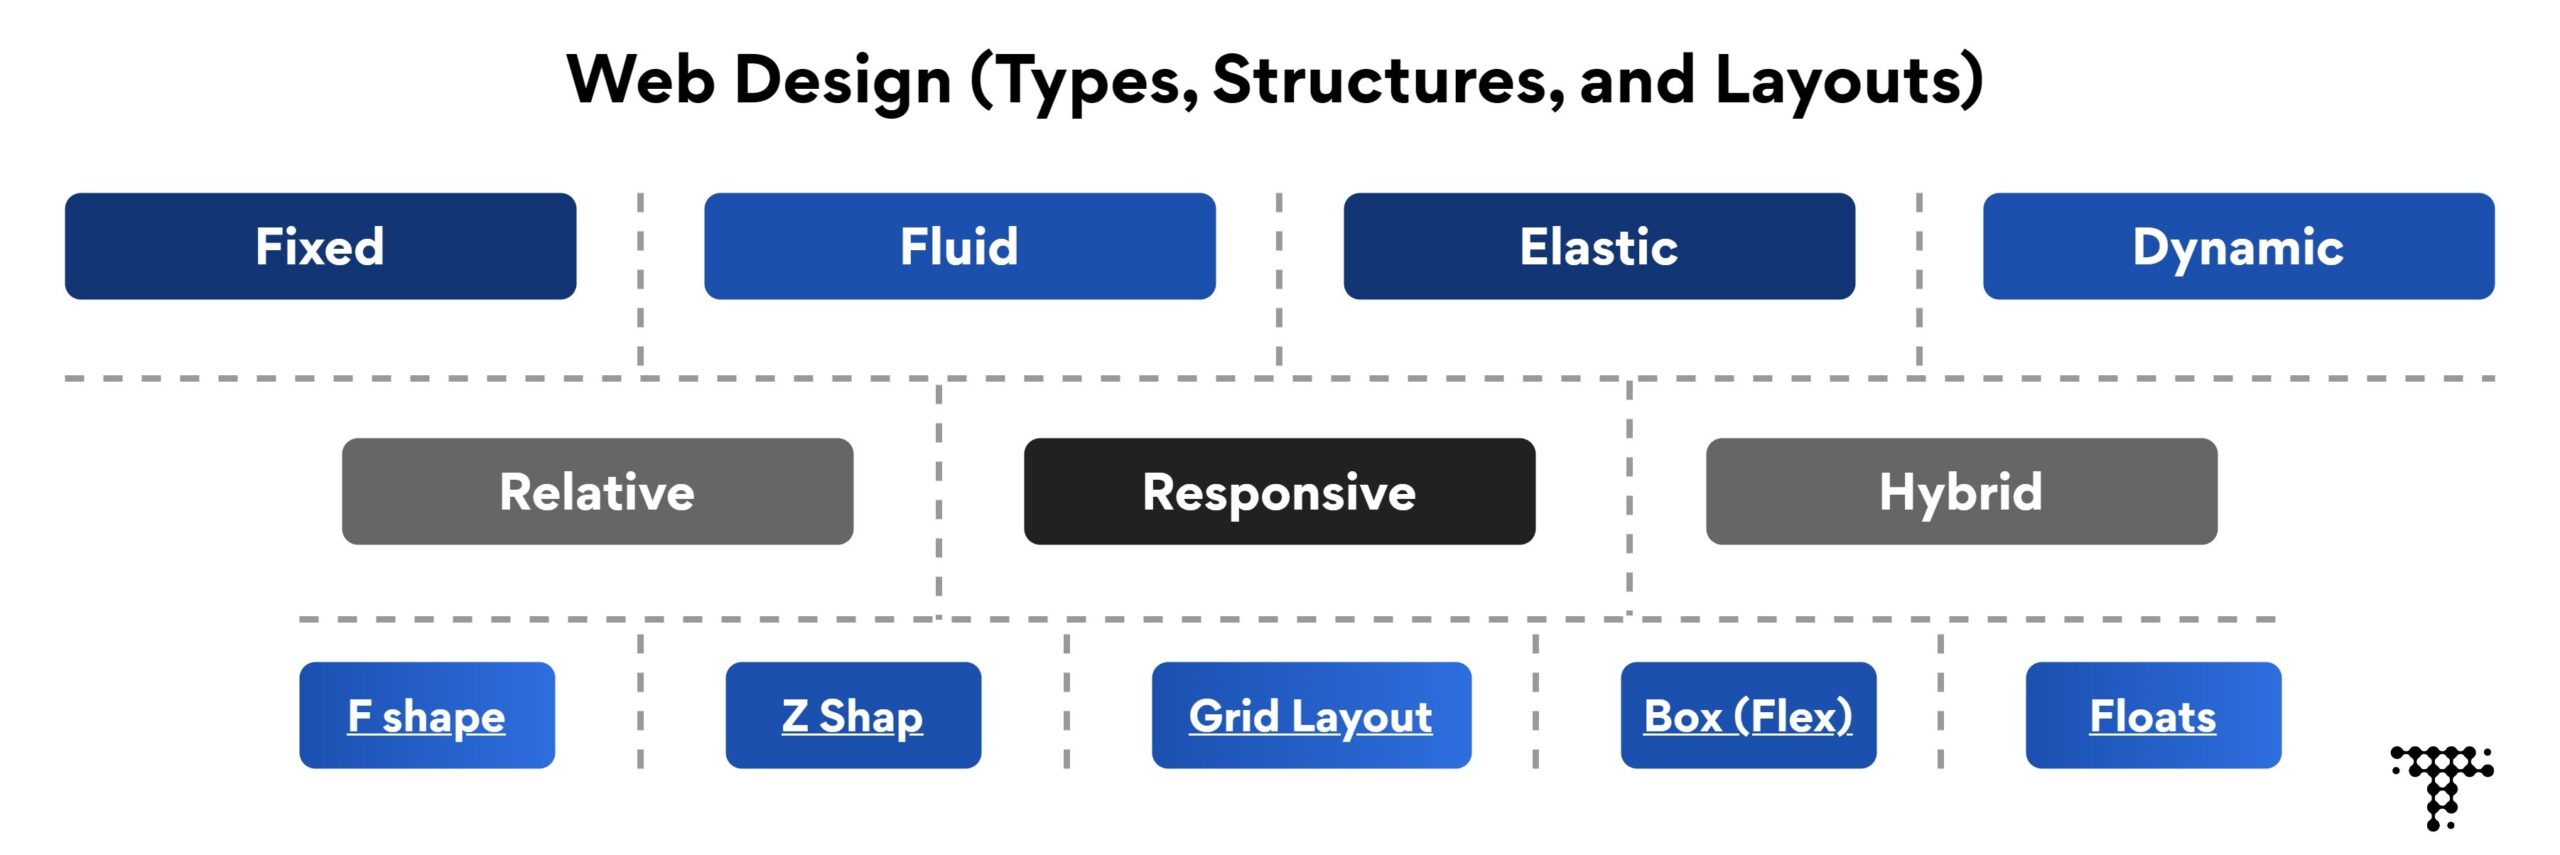
CSS Design Types

CSS Design Types

How to create contemporary designs using HTML and CSS?

Building a modern-day website with contemporary CSS designs is no longer a challenging process as you’ve got access to all of the essential tools and frameworks to develop a visually appealing as well as accessible front end.

  • Organize the layout or structure: To create a contemporary design using CSS, ensure the layout/structure is well organized; it can be on paper or in a graphic design. This reference helps create the infrastructure and design the placeholders for different components and elements.
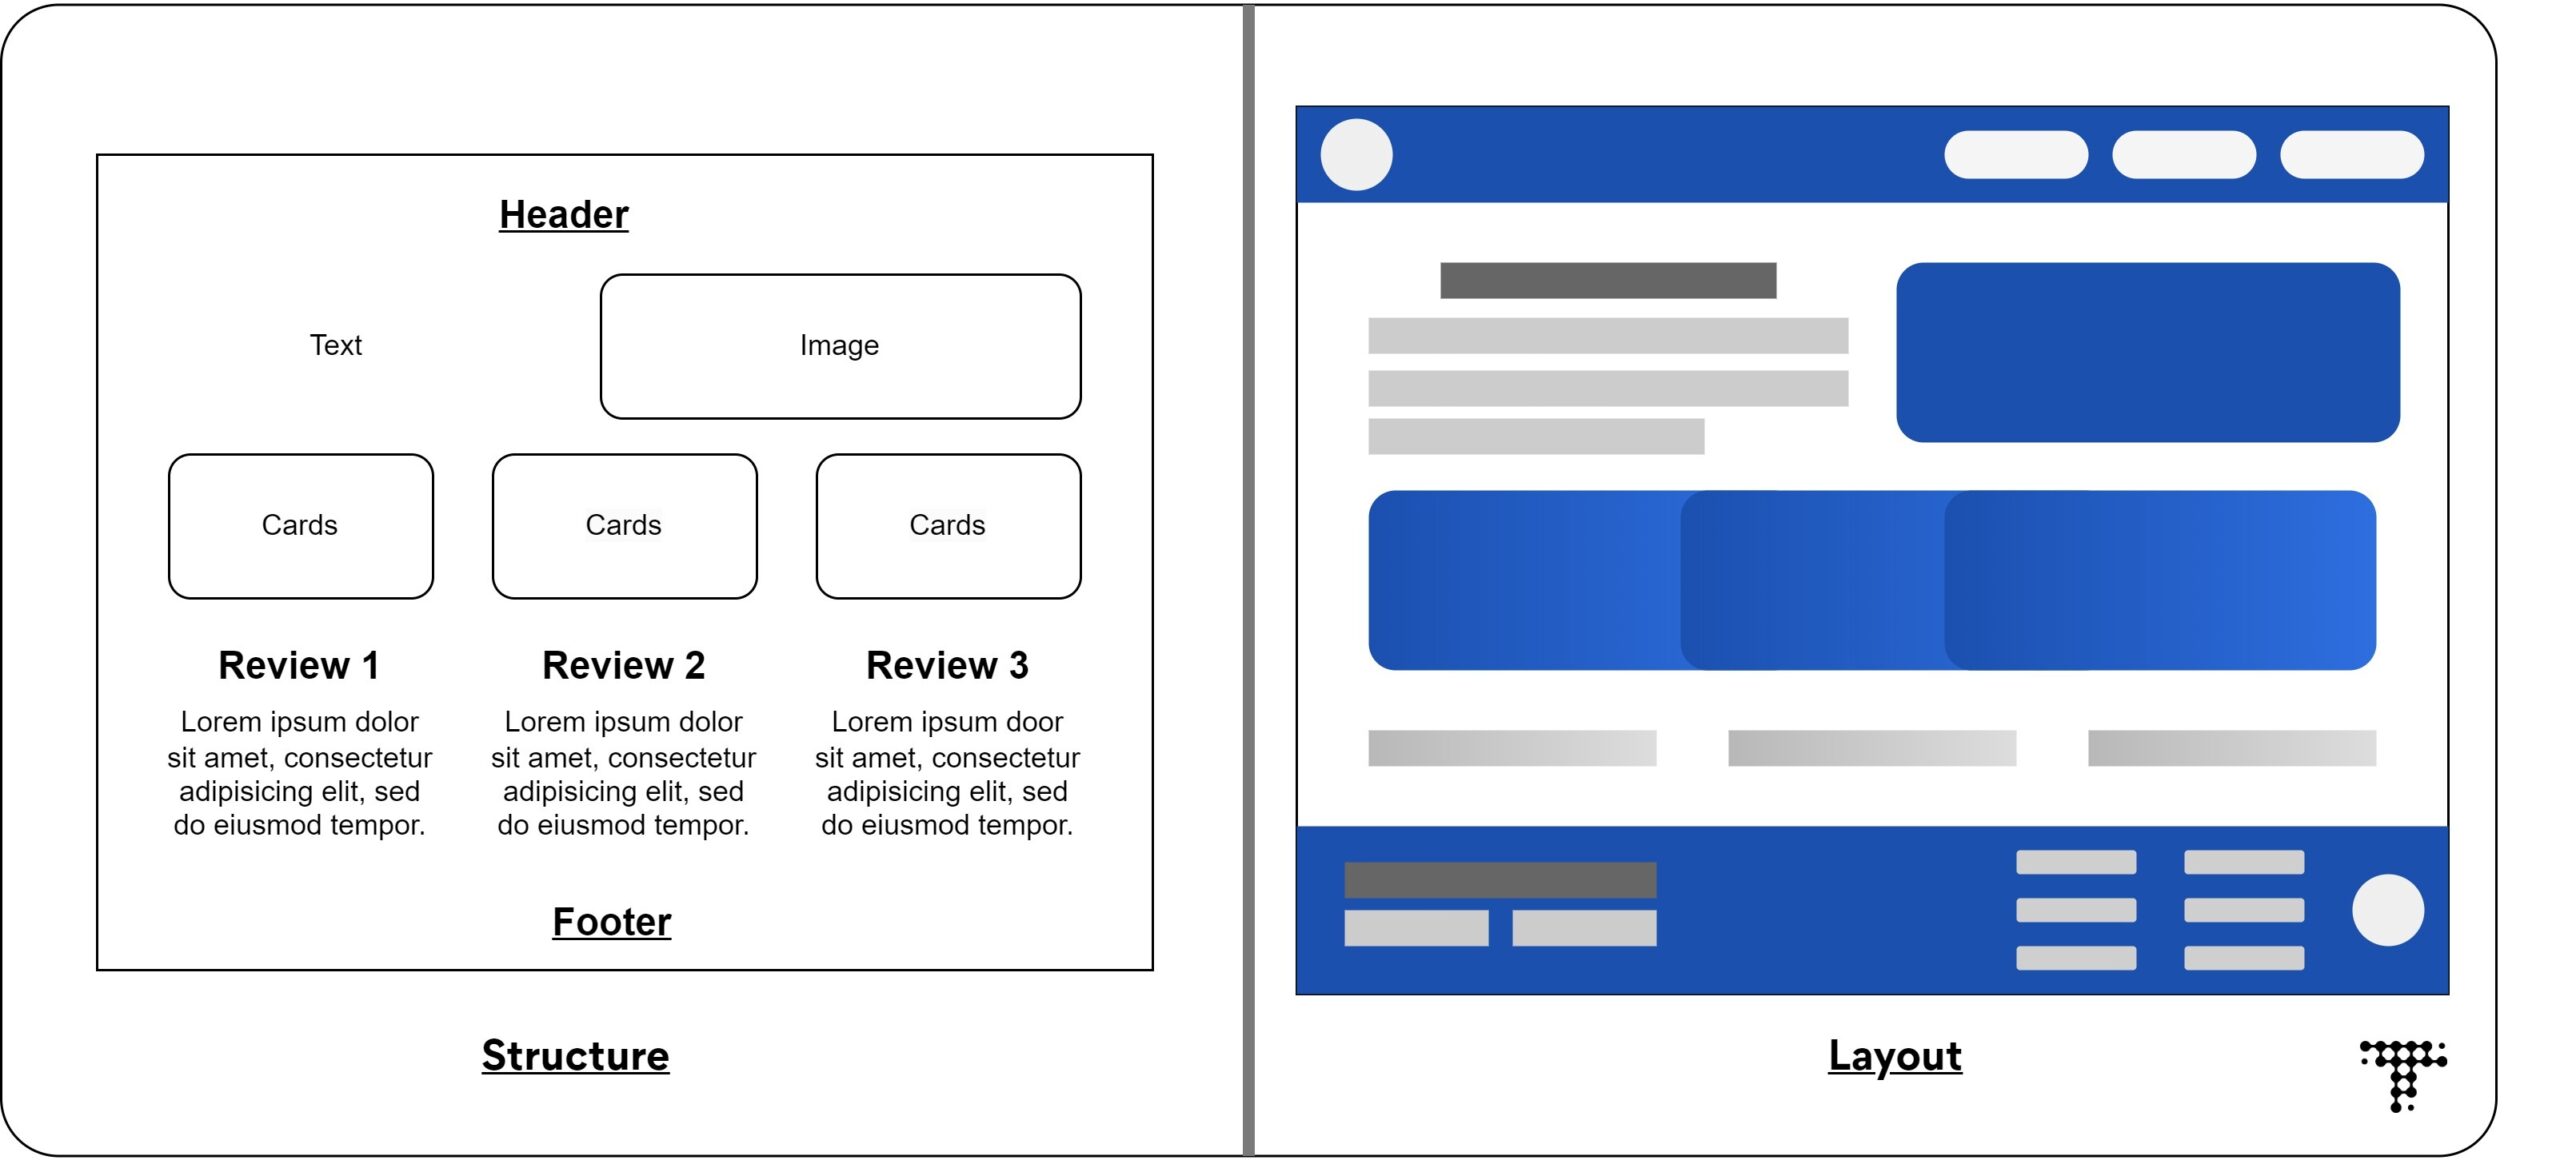
    Web Design Layout

    Web Design Layout

  • Pick a proper color scheme and fonts: This step is essential to complete before writing the first line of CSS design, as it can take a long time and a different mindset to decide the aesthetics.
  • Deciding animations and transitions: Using too many effects in CSS web designs might interfere with the functionality or cause other components to be disrupted. As a result, it is necessary to decide which elements will have which kind of animations.
  • Have an open mindset: While designing the front-end layout, functionality is always considered; however, while designing with HTML and CSS, some features may not operate as expected. Having an open approach/mindset is, therefore, essential.

CSS designs with code samples 

CSS layouts, structures, and properties can be used to build modern web designs. The ideal design is determined by the website’s specific requirements and goals. 

Here are some significant CSS design types and layouts to create a contemporary web design in 2023.

CSS gradient background 

Designing a background with the appropriate color scheme is critical for highlighting the elements on the screen. When we utilize Gradient effects on the backdrop, it improves the overall appearance. With a simple CSS design, we can implement a gradient background.

First, we need to provide the background with gradient colors according to the color scheme,

background: linear-gradient (-45deg, #5C54CF, #B34FE0, #FDB721, #FB3443)

Then provide the animation to the background. Here the animation name is changed. We will also provide the duration of the animation.

animation: change 15s ease infinite

After creating the background, we declare the animation with the keyframes rule in our CSS web design.

Here’s the whole code sample for gradient background animation using HTML and CSS.

<!DOCTYPE html>
<html>
<head>
    <title>Animated Gradient Background</title>
    <style>
        body {
            background: linear-gradient(-45deg, #5C54CF, #B34FE0, #FDB721, #FB3443);
            background-size: 400% 400%;
            animation: change 15s ease infinite;
        }
       
        @keyframes change {
            0% {
                background-position: 0% 50%;
            }
            50% {
                background-position: 100% 50%;
            }
            100% {
                background-position: 0% 50%;
            }
        }
       
        h1 {
            text-align: center;
            color: black;
            font-family: 'Gordita';
            font-size: 4rem;
            margin-top: 40vh;
        }
       
        p {
            text-align: center;
            color: white;
            font-family: 'Helvetica Neue', sans-serif;
            font-size: 2rem;
        }
    </style>
</head>
<body>
    <h1>Background Effect with CSS</h1>
    <p>This is an example of an animated gradient background using CSS.</p>
</body>
</html>

Parallax CSS designs

Parallax is a popular contemporary CSS design technique that produces a 3D illusion by animating separate layers at different speeds as the user scrolls. The position of different elements (mostly images) plays a vital role in creating the parallax effect. 

Having graphics ready is crucial to start to create this effect.

Here class “parallax-container” will define the section of the web page where the parallax effect will be applied.

.parallax-container {
 position: relative;
 height: 500px;
}

.parallax {
 position: absolute;
 height: 200%;
 width: 100%;
 z-index: -1;
}

The parallax class is used to specify the moving backdrop image. The CSS method translate3d() is used to shift the background pictures up or down based on how far the user has scrolled.

Integrate jQuery (JavaScript) to implement the parallax animation on the containers.

Here scroll event and requestAnimationFrame() optimize performance for a parallax animation effect. To animate background pictures for each parallax element, the loop uses a translate3d() transformation.

$(window).on('scroll', function () {
  window.requestAnimationFrame(function () {
    for (var i = 0; i < parallaxQuantity; i++) {
      var currentElement =  parallaxElements.eq(i);
      var scrolled = $(window).scrollTop();
        currentElement.css({
          'transform': 'translate3d(0,' + scrolled * -0.15 + 'px, 0)'
        })

The overall code of CSS design for the parallax effect:

<!Doctype html>
<html>
  <script src="https://code.jquery.com/jquery-3.6.0.min.js"></script>
  <style>
    .content {
  background: #000000;
  height: 75vh;
 
  display: flex; /* added display flex */
  align-items: center;
  justify-content: center; /* added justify-content center */
  color: #ffffff;
}
 
.parallax-container {
  position: relative;
  height: 500px;
}
 
.parallax {
  position: absolute;
  height: 200%;
  width: 100%;
  z-index: -1;
}
  </style>
 
<section class="content">
  <h1>Parrllax Effect (Scroll Down)</h1>
</section>
 
<section class="parallax-container">
  <div class="parallax" style="background: url(https://upload.wikimedia.org/wikipedia/commons/9/98/House_in_forest_%28Unsplash%29.jpg) center center / cover no-repeat;"></div>
</section>
 
<section class="content"></section>
<section class="parallax-container">
  <div class="parallax" style="background: url(https://upload.wikimedia.org/wikipedia/commons/a/a5/FREMLIN_WALK_MAIDSTONE_NEW_PASTEL_COLOUR_BUILDINGS_%2834691842761%29.jpg) center center / cover no-repeat;"></div>
</section>
 
<section class="content"></section>
<section class="parallax-container">
  <div class="parallax" style="background: url(https://upload.wikimedia.org/wikipedia/commons/1/18/Grundvig_memorial_church.jpg) center center / cover no-repeat;"></div>
</section>
 
<script>
var parallaxElements = $('.parallax'),
    parallaxQuantity = parallaxElements.length;
 
$(window).on('scroll', function () {
 
  window.requestAnimationFrame(function () {
 
    for (var i = 0; i < parallaxQuantity; i++) {
      var currentElement =  parallaxElements.eq(i);
      var scrolled = $(window).scrollTop();
         
        currentElement.css({
          'transform': 'translate3d(0,' + scrolled * -0.15 + 'px, 0)'
        });
 
    }
  });
 
});
</script>
 
</html>

Responsive CSS designs

Responsive design is a no-brainer for designing today’s web products; it’s crucial to implement it in the very first place.

Responsive CSS design aims to produce websites that adjust to various screen sizes and device varieties. The objective is to guarantee that the website appears and performs properly on all platforms, including desktop computers, laptops, tablets, and phones.

Let’s use simple CSS to implement the responsive design on the image and the parallel text.

<!DOCTYPE html>
<html>
<head>
    <meta name="viewport" content="width=device-width, initial-scale=1">
    <title>Responsive Example</title>
    <style>
        .container {
            display: flex;
            align-items: center;
        }
        .text {
            margin-left: 20px;
        }
        img {
            max-width: 20rem;
        }
        @media (max-width: 768px) {
            .container {
                flex-direction: column;
            }
            .text {
                margin-left: 0;
                margin-top: 20px;
                text-align: center;
            }
        }
    </style>
</head>
<body>
    <div class="container">
        <img src="https://upload.wikimedia.org/wikipedia/commons/a/a5/FREMLIN_WALK_MAIDSTONE_NEW_PASTEL_COLOUR_BUILDINGS_%2834691842761%29.jpg" alt="Example Image">
        <div class="text">
            <h2>The Modern Day Life</h2>
            <p>Lorem ipsum dolor sit amet, consectetur adipiscing elit. Nullam vel elit eget elit mollis convallis. Aliquam bibendum tortor non augue laoreet, quis lacinia nisl pharetra.</p>
        </div>
    </div>
</body>
</html>

With the simple use of the viewport property in HTML, the responsive design of the web page can be achieved.

3D CSS web design 

CSS designs with 3D effects are getting better and better day by day. The CSS’s frameworks and flexibility allow engineers to create super-effective 3d designs.

A solar system 3D design curated using CSS by Julian Garnier showcases the implementation of different CSS design principles.

This CSS design uses rules like keyframes and media and includes the navigations and transition properties to create a 3d effect.

With different shapes and designing properties of CSS, the solar system with concise accuracy has been created. You can create 3d effects on simple shapes, containers, or text to enhance the user experience.

Typography 

Typography in CSS web design simply refers to the visualization of the text; it can be its font, position, and other properties. But here, typography designs using CSS means creating visually appealing text for the user to catch their attention and enhance the overall experience.

Here is an effective code sample for creating aesthetic typography with simple CSS (Resource)

* {
  box-sizing: border-box
 }
 
 :root {
  --color-1: #186cb8;
  --color-2: #2a9a9f;
  --color-3: #f1b211;
  --color-4: #e83611;
  --color-5: #f9002f;
 }
 
 .wrapper {
  background: #000;
  line-height: 1;
  min-height: 100%;
  display: grid;
  place-items: center;
  min-height: calc(100vh - 16px);
 }
 
 h1 {
  font-family: "Exo", sans-serif;
  font-size: 15vw;
  font-weight: 900;
  width: -webkit-min-content;
  width: -moz-min-content;
  width: min-content;
  margin: auto;
  text-transform: uppercase;
  background: linear-gradient(219deg, 
   var(--color-1) 19%, 
   transparent 19%,transparent 20%, 
   var(--color-2) 20%, var(--color-2) 39%,
   transparent 39%,transparent 40%, 
   var(--color-3) 40%,var(--color-3) 59% ,
   transparent 59%,transparent 60%, 
   var(--color-4) 60%, var(--color-4) 79%,
   transparent 79%, transparent 80%, 
   var(--color-5) 80%);
  background-clip: text;
  -webkit-background-clip: text;
  color: transparent;
 }
 
 .container {
  padding: 1.5rem; 
  text-align: center;
  background: radial-gradient(circle at 1.4% 1.4% ,var(--color-1) .8%,transparent .8% ), 
   radial-gradient(circle at 5.5% 3%,var(--color-2) .45% ,transparent .45% ), 
   radial-gradient(circle at 2.5% 3.5%,var(--color-3) .5% ,transparent .5% ), 
   radial-gradient(circle at 4.5% 1.2%,var(--color-4) .25%,transparent .25% ),
 
   radial-gradient(circle at 98% 98% ,var(--color-1) .8%,transparent .8% ), 
   radial-gradient(circle at 95% 95%,var(--color-2) .45% ,transparent .45% ), 
   radial-gradient(circle at 94.5% 97.5%,var(--color-3) .5% ,transparent .5% ), 
   radial-gradient(circle at 98.5% 95.5%,var(--color-4) .25%,transparent .25% );
  
 }
 
 @media screen and (min-width: 768px) {
  h1 {
   font-size: 6.5rem;
  }
 }

Dynamic layout 

The dynamic layout refers to the ability of the platform to adapt its visual interface. Various properties such as constraints, flexbox, grid, and dynamic units provide a dynamic layout to a contemporary CSS design. One typical application for dynamic layout is in mobile applications, where users can move between portrait and landscape orientations. In these situations, a dynamic layout helps ensure the user interface remains functional and aesthetically appealing regardless of the device.

In sum

With the right implementation of CSS properties, you can create effective animations, responsive designs, and aesthetically pleasing dynamic layouts. CSS designs and their properties are an important part of web development and will continue to shape the future of web design and user experience.

To stay ahead in this creative and logical field, it is critical to keep up with the latest developments in CSS designs. After all, it comes down to the lasting impression you leave on the user.

Are you a developer looking for high-paying remote US software jobs? Look no further. Turing can help you land your dream software jobs with top US companies. Visit the Apply for Jobs page for more information.

Join a network of the world's best developers and get long-term remote software jobs with better compensation and career growth.

Apply for Jobs

By Mar 29, 2023
Eclipse Shortcuts and Productivity Tips for Java Developers!
Mental Health and Productivity

35+ Eclipse Shortcuts and Productivity Tips for Java Developers!

This blog covers top Eclipse shortcuts and productivity hacks for 2023. Get in to explore tips and tricks for Eclipse IDE for Java.

If you’re a developer, having a solid understanding of how to use an IDE can significantly improve your workflow and speed up your coding process. Different IDEs have various shortcuts and plugins to enhance the programming experience; for example, Eclipse shortcuts can assist Java developers in increasing productivity and speed while using Eclipse IDE for Java development.

In this blog, we will uncover some of the best Eclipse shortcuts and productivity tips that can help you save time and increase your coding efficiency. So, let’s get started!

What is Eclipse IDE used for?

Eclipse is a popular Java IDE for software development, specifically for Java language. It provides an integrated development environment for widely used languages and frameworks. Like other IDEs, it is well equipped with a built-in editor, debugger, and code control system.

It is open-source software with large support from the community.

How to install Eclipse IDE for Java? 

To install Eclipse IDE for Java on your system, follow these steps:

  1. Download the latest version of Eclipse IDE.
  2. Unzip the downloaded file.
  3. Navigate to the unzipped directory → install the Eclipse by clicking the “.exe” eclipse file.
  4. Once Eclipse is installed, you can launch it.
  5. After launching the IDE, select a workspace directory where your projects will be stored.
  6. The Eclipse will now open, and you can start creating your first Java project by creating “src” file and Java package.

Important: Latest versions of Eclipse require Java SDK for its run time environment, so make sure Java is already installed on your system before downloading the Eclipse IDE.

Latest Eclipse shortcuts

One of Eclipse’s most useful features is its keybindings/shortcuts, which make coding easier and faster. Here’re some of the most useful Eclipse shortcuts for Java developers.

  1. Change case: If you have some text in lowercase and want to change it to uppercase, simply highlight it and hit Ctrl Shift X; for vice-versa, click Ctrl Shift Y.

  2. Autocomplete: If you want to print something in Java, you can type “System.out.println” and click Ctrl + Space. The Eclipse will automatically complete the code and put the cursor in between the two parentheses; here, you can fill in the content you want to print.

  3. Main Method: Enter “main” and press Ctrl + Space; the first proposal will be the primary technique choice. With this Eclipse shortcut, you can write the main method with only a few keystrokes.

  4. Loops: Simply write the loop (for example, “for,” “while,” or “do”) and press Ctrl + Space. The Eclipse will present you with many loop options from which you can select one and enter the conditions.

  5. Conditional statements: In Eclipse, constructing an if statement is as simple as starting a loop. Enter “if” and press Ctrl + Space. Select the conditional statement from the options presented.

  6. Try-Catch block: Eclipse makes surrounding your code with a try-catch block easy. Simply choose the code covered by a try-catch and press Alt Shift Z; many alternatives will show up for enclosing the code, including a try-catch block.

Eclipse Shortcuts for code editing

Whether you want to comment out code or jump to a particular line rapidly, these Eclipse shortcuts for windows will make your code editing smooth.

  1. Use Ctrl + / for commenting, uncommenting lines, and blocks
  2. Ctrl + Shift + / shortcut is used for commenting and uncommenting lines with block comments.
  3. Alt + + R for renaming class, variable, method (function), etc. 

To format your code

  1. Select text, then Ctrl + Shift + F for formatting.
  2. Selecting class and press F4 to see its Type hierarchy

To handle the files

  1. You can use Ctrl + F4 or Ctrl + w to close the current file
  2. Click Ctrl + Shift + W to close all files.
  3. Ctrl + F to find/replace in file
  4. Ctrl + H to find and replace in file, project, or directory.

To migrate in-between lines

  1. Go to the line (line number): Ctrl + L
  2. To delete the line: Ctrl + D 
  3. Press Ctrl + Q to go to the last edited place
  4. You can quickly shift a line or numerous lines of code up or down in your application. Simply move the line by using Alt + up or down arrows. (This allows you to place the code anywhere you wish in your software.)

Shortcuts for quick navigation in Eclipse

Navigate through the Eclipse environment with ease using these Eclipse shortcut keys. These shortcuts will navigate you in a jiffy from switching between editors to jumping to a specific feature/location.

  1. Ctrl + 3: Quick access to any menu item or feature in Eclipse
  2. Ctrl + Shift + T: Open a type quickly
  3. Open a resource (e.g., file, image): Ctrl + Shift + R.
  4. Ctrl + O: Quickly navigate to a method in the current class
  5. Ctrl + 1: Shows available code actions and quick fixes
  6. Quickly navigate to the superclass or implemented interface of the current type with Ctrl + T.
  7. Ctrl + Shift + L: Used for “Show Key assist,” previously used for Quicksearch
  8. Ctrl + Q: Quick navigation to the last edit location (last edited line).

Also, read Best VS Code Shortcuts and Productivity Hacks for 2023

Eclipse shortcuts for debugging

Debugging can be time-consuming, but with these Eclipse shortcuts, you can streamline the process and get to the root of the issue quickly.

Debug mode

  1. F5 (Step into): This allows you to enter debug mode.
  2. F6 (Step over): This assists in moving to the next line without leaving debug mode.
  3. F7 (Step out): This allows you to step out/return to the current method/caller in debug mode.
  4. F8 (Resume execution): This allows you to continue executing the program without stopping debugging.
  5. F9 (Toggle breakpoint): This allows you to set or remove a breakpoint on the current line of code. A breakpoint will cause the program to stop executing and enter debug mode.

Application debugging

  1. Ctrl + F11: Use this to run the last application opened.
  2. F11: Run the program in debug mode, where you can step through the code and inspect variables.

Show Perspectives 

  1. Ctrl + Shift + B: This opens the Breakpoints view, which displays all the breakpoints set in your workspace.
  2. Ctrl + Alt + R: This opens the Debug Perspective, a special view that provides tools and information specifically for debugging.
  3. Ctrl + ↑ + I: Inspect the value of a variable during debugging.

In sum

Eclipse has a strong community and many experienced Java developers for support. Having know-how of effective Eclipse shortcuts and productivity tips can help you in making your coding journey on this widely used IDE efficient. So, try them out and see the change in speed and productivity yourself.

Are you a software developer looking for remote Us jobs that offer high salaries and flexibility to work from anywhere? Top US companies are hiring with Turing. Apply now!

Join a network of the world's best developers and get long-term remote software jobs with better compensation and career growth.

Apply for Jobs

By Feb 20, 2023
Best VS Code Shortcuts and Productivity Hacks
Mental Health and Productivity

Best VS Code Shortcuts and Productivity Hacks for 2023

This is a guide to the most useful VS code shortcuts and productivity tips. So, boost your efficiency by unlocking the full potential of the code editor.

As a developer, having the right tools at your disposal is essential. Visual Studio Code, or VS Code, is one such application that has become popular amongst developers. Whether you’re a beginner or an experienced developer, VS Code is the editor that can fulfill every demand. Its flexibility and customization options make it a versatile tool that can be tailored to fit your specific needs.

Also, read: 7 Popular Front-End Tools to Check Out

However, having a product that can be customized for every line of code can sometimes be overwhelming. This blog post will help simplify the essential productivity hacks for VS Code to help you work more efficiently. We’ll review everything you need to know, from VS Code shortcuts to extensions and settings. So, whether you want to increase your productivity, improve your workflow, or simply learn new tactics and insights, this blog has you covered.

Table of contents

What is VS code used for?

Visual Studio Code (VS Code) is a robust, open-source code editor developed by Microsoft. It supports multiple programming languages and offers features like syntax highlighting, code completion, and debugging, which ease the process of writing and testing code. 

VS Code’s popularity arises from its ability to handle various software development activities such as web development, app development, and data science. Furthermore, its flexibility via plugins and extensions enables customization and optimization to fit unique project needs.

How do you VS Code effectively?

First and foremost, keeping track of official VS Code documentation for finding the updated VS Code shortcuts and tips is crucial; this can help you stay updated with the helpful practices you can follow to boost your productivity.

Another critical part of properly utilizing VS Code is learning how to navigate the UI. For this,  you need to understand the various aspects of the interface, such as the editor, sidebar, and status bar, and know how to use VS code keyboard shortcuts (which we will go over in more detail later).

Additionally, you can use features like IntelliSense for smart completions based on variable types, function definitions, and imported modules to write code more efficiently.

Also, read: Looking for Software Developer Jobs? Learn to Write Clean Code First

Each project in VS Code can be tailored according to your own requirements. You can customize most things, like

  • Add your preferred color scheme
  • Alter the text size. 
  • Reorganize the interface’s structure.

What are some popular VS Code shortcuts? How do you use these VS Code shortcuts? 

Let’s dive in and learn about shortcuts and productivity hacks in detail!

The almighty command palette

Command palette is a powerful tool that allows you to access various commands and settings in VS Code quickly and easily. Press Ctrl + Shift + P to navigate through the command palette and perform the regular and complex functions. You can instantly access a variety of bindings and Visual Studio Code shortcuts that will make your workflow more effective by utilizing the command palette.

For example, you can use the command palette to open recently opened files without navigating through multiple directories in the file explorer. Additionally, you can use the command palette to start typing a file name and quickly find it within your project. This practice can save you time and make your work more streamlined.

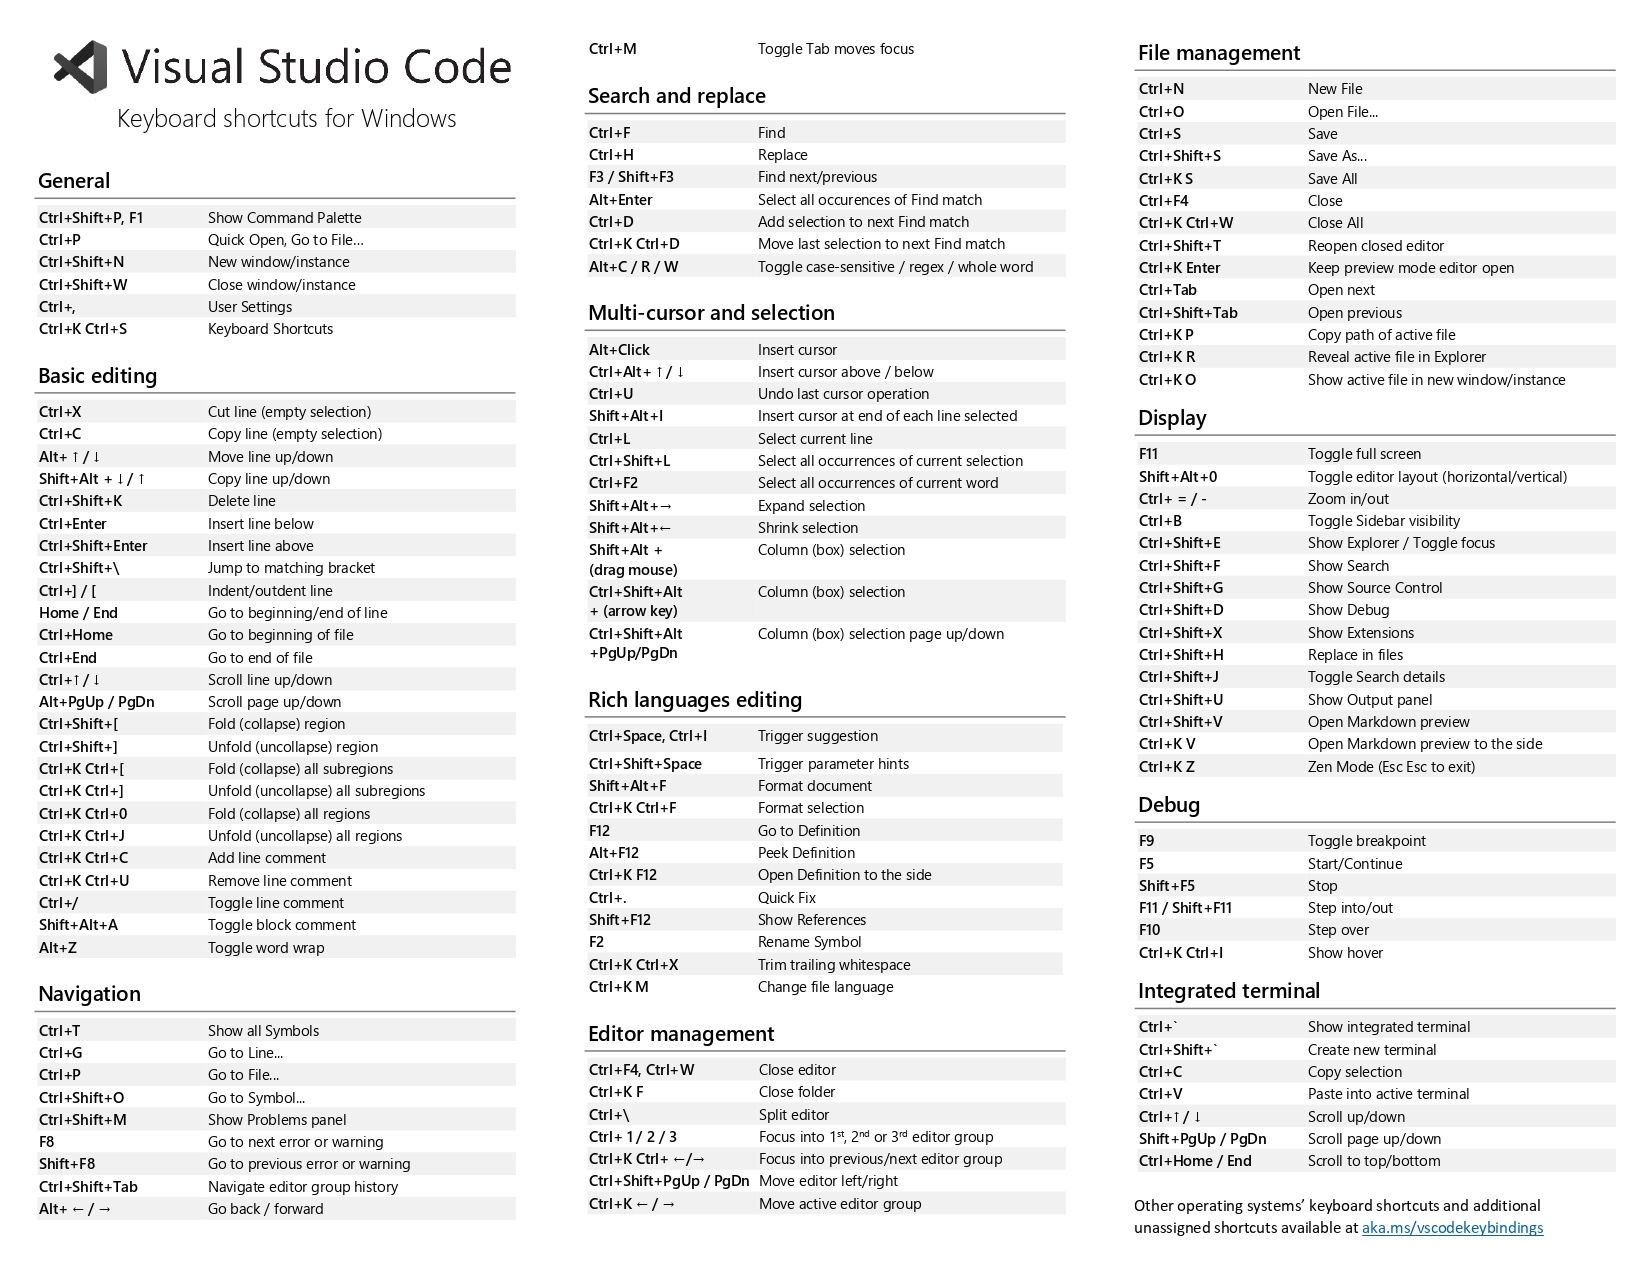
Use VS Code keyboard shortcuts  

VS Code Shortcuts Keyboard Shortcuts

VS Code Shortcuts Keyboard Shortcuts

VS Code has a wide range of keyboard shortcuts to help you explore, modify, and organize your code more effectively. 

Using the mouse to perform regular tasks is appealing due to VS Code’s enticing GUI. But using the keyboard to perform the same functions is recommended because it is faster, efficient, and having your hands on the keyboard more than the mouse makes you a cool developer that everybody wants to hang around.

To traverse around the entire VS code, utilize the command palette (Ctrl + Shift + P). This can help you leave the mouse and rely more on the keyboard because everything can be managed via the single navigation bar in VS Code.

Here are the prominent VS Code keyboard shortcuts.

Best VS Code extensions to increase productivity

VS Code has a large library of extensions that can add new functionality to the editor, such as language support, debugging tools, and productivity enhancements. These add-ons transform VS Code into a robust IDE.

Quokka VS Code extension

Quokka VS code extension

Quokka VS code extension

Quokka is a real-time coding tool that lets developers see the outcomes of their code as they type it. It is very beneficial for testing code, and it can save developers a significant amount of time. Quokka is remarkable because it executes your JavaScript or TypeScript code in the background and then inserts the output straight into your editor.

Auto Rename Tag VS Code extension

Auto Rename Tag VS Code extension

Auto Rename Tag VS Code extension

This extension enables developers to rename HTML and XML document tags quickly. It saves time and decreases the possibility of errors. When you update the beginning tag, this plugin will automatically rename the closing tag, and it can function in languages other than HTML.

Also, read: Top 21 HTML Interview Questions and Answers for 2023

JS Doc Extension of VS Code 

This extension assists developers in inserting JSDoc comments into their JavaScript code. It includes a set of templates and VS Code shortcuts to help you document code faster and more efficiently. The link tag can be used to link to other symbols in your source code.

Also, read: 10 JavaScript Interview Questions and Answers You Must Know

Remote SSH VS code extension

Remote SSH VS code extension

Remote SSH VS code extension

Remote SSH helps programmers access servers and containers from a remote location. It is beneficial while working on projects hosted on distant servers or containers.

Paste as JSON VS code extension 

Paste as JSON VS code extension

Paste as JSON VS code extension

This plugin makes it simple for developers to insert JSON data into their programs. It formats the JSON automatically, making it easier to read and comprehend.

Integrated terminal 

The integrated terminal in Visual Studio Code (VS Code) is a powerful feature that enables developers to perform command-line commands directly from the VS Code interface. It can be used to compile code, run tests, and manage version control systems such as Git.

One of the primary advantages of the integrated terminal is that it allows developers to work on both code and command-line operations in the same environment rather than jumping between distinct apps. Use VS Code shortcut: Ctrl + ~ or click on View → Terminal to open the integrated terminal.

To start a new terminal, use the shortcut: Ctrl + Shift + ~, and to concentrate on the terminal, use Ctrl + ~. One lesser-known approach is to divide the terminal into different panes using Ctrl + Shift + 5 and navigate to different panes using Ctrl + > or <.

Multiple terminals can also be launched simultaneously, allowing you to perform different commands concurrently. Overall, the integrated terminal in VS Code is a strong and adaptable tool that may significantly improve your development process.

Git Integration 

Git is a version control system that enables developers to monitor changes to their code over time and interact with other developers working on the same codebase. It enables developers to generate and maintain various versions of code, known as branches, and merge them once they are complete.

Visual Studio Code Git integration allows developers to do Git tasks such as committing, pushing, pulling, and branching within the editor. For example, Git integration in VS Code allows developers to manage their code repositories within the editor, speeding the development process and boosting team cooperation.

Some handy VS Code shortcuts for Git integration include “CTRL+SHIFT+G” (or “CMD+SHIFT+G” on Mac) to access the Source Control panel and “CTRL+SHIFT+9” (or “CMD+SHIFT+9” on Mac) to toggle the Git lens on the left sidebar. 

One lesser-known technique is that Git integration can be used to generate and switch between different branches, making it simple to work on numerous features or bug fixes simultaneously.

Use the VS Code debugger effectively

The Visual Studio Code debugger is a powerful tool that can help you increase productivity by allowing you to analyze and debug your code easily. One of the key features of the debugger is the ability to set breakpoints, which pause the execution of your code at specific lines and allow you to inspect variables.

To address the topic, “How to debug effectively in Visual Studio,” here are some strategies you can use.

  • Use “breakpoints” to halt code execution and analyze variables at specific lines. To set a breakpoint, click to the left of the line number in the editor or press F9 while the cursor is on the line.
  • To keep track of individual variables during debugging, use the “Watch” window: press Ctrl + Shift + D (Windows/Linux) or Cmd + Shift + D (macOS) to launch the “Watch” window and add variables to it.
  • To understand the execution path of your code, open the “Call Stack” window by pressing Ctrl + Shift + C (Windows/Linux) or Cmd + Shift + C (macOS).
  • Use “Step Over” to run the current line of code and advance to the next by clicking F10.
  • By pressing F11, you can jump into a function or method and debug it line by line (Step Into). Press Shift + F11 to quit the current function or method and return to the calling function (Step Out). F5 will restart the execution of your code (Continue). 
  • To switch between debugging environments, access “Debug” settings by pressing Ctrl + Shift + D (Windows/Linux) or Cmd + Shift + D (Mac) (macOS). 
  • Depending on the language, you can use the “threads” command to display all threads and the “thread” command to switch to a single thread, and then use all other commands as usual to debug multi-threaded debugging.

In sum: what are the benefits of using VS Code shortcuts?

Incorporating productivity hacks into your daily tasks can be a game changer for you as a coder. You can get the most out of the editor by customizing your workspace, using and creating VS Code shortcuts, and employing extensions. The tips and tricks above can help you become more productive with VS Code. 

If you want to take your software development career to the next level, we can help you. We connect top developer brains like you with remote jobs in top US-based companies. Click on the Apply for Jobs button to know more. 

Join a network of the world's best developers and get long-term remote software jobs with better compensation and career growth.
Apply for Jobs

By Feb 1, 2023
Selenium with Python – A Step-By-Step Guide
Languages, frameworks, tools, and trends

Selenium 4.7 Automation with Python: A Comprehensive Guide

In this blog post, we will learn about testing automation using Selenium with Python and understand the types of testing you can perform with Selenium.

Today, automation has taken over every aspect of technology. Subsequently, software testing trends have also evolved to keep pace. Tech stacks like Selenium with Python have made automation easier for scraping, iteration, or testing applications. Manual testing of software serves its purpose in small-scale projects. However, testing teams need to run a huge number of cross-functional tests for large-scale application development and frequent updates. This is where the power of Python and frameworks like Selenium for automation comes in handy.

In this blog post, we will go through the step-by-step process of automated testing by using Selenium with Python.

Table of Content:

What is Selenium?

Selenium is a free, open-source automation testing suite for web applications across different browsers and platforms. Selenium is a framework that allows you to interact with HTML elements from any website. With Selenium, we can interact with the elements rather than just extracting information from a webpage. 

For example, we can run automated scripts to test various web app components using Selenium. Selenium works with any major programming language, including Python, C#, Java, JavaScript, and others.

Also, read: Popular Selenium Interview Questions and Answers for 2023

What is Python?

Python is an interpreted, object-oriented, high-level programming language with dynamic semantics. Python has become one of the most popular programming languages in the world in recent years. 

In the automation kingdom, Python language is like a lord, ruling the code peasants and turning complex snippets of automation into simple functions. Python developers find Python to be an automation wizard because of the following reasons.

Also, read: 8 Python Interview Questions Hiring Managers Love Asking Developers

  • Ease of learning for professionals as well as beginners
  • Less code, more tasks, which is very important for complex programs like test automation
  • Rich libraries with useful modulus to automate (literary) anything.

Below, we will perform basic-level front-end tests using Selenium with Python.

Getting started

First, you’ll need to install Python on your system (Windows/Mac OS/Linux). For this tutorial, we’ll be using Windows.

Install Selenium in Python

If you use the command line prompt, run the python command to get started. If you’re using an IDE, simply create a new Python file.

Use the “pip” command in your terminal to install the Selenium package for Python. 

Selenium with Python

Using pip command

Download web driver

Selenium works with all major browsers, including Chrome, Firefox, Internet Explorer, Safari, and Edge. We are using Chrome for this tutorial. 

Check the web browser version you’re using before downloading the web driver.

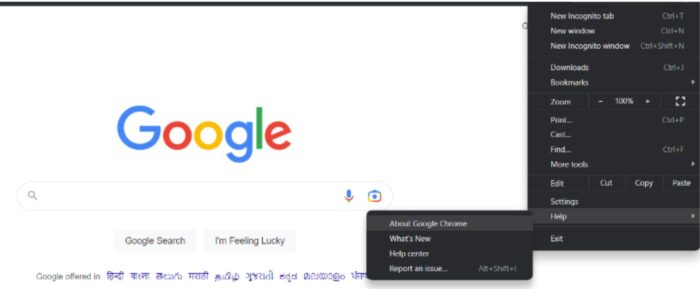
>> To find the version of Chrome, you can go to help → About Google Chrome and find the Chrome version. 

Selenium with Python

Find the version of Chrome

Go to the Chrome web driver website. Here, you can find the version of Chrome that you are using and then click the corresponding version of the Chrome web driver. 

Choose the option for the system you’re using and make sure to download the zip file for your system solely; otherwise, it might lead to misunderstanding. 

Once downloaded, extract the file and place it in a specific location on the operating system. 

We recommend placing it in the safe directory, which is not often accessed like ‘Program files’ in C-disk. 

Now we have everything in place, let’s connect our script with the web browser.

Connecting Selenium with Python and browser

To test Selenium installation, type ‘import Selenium’ in a Python window or Python script. If you don’t get any errors, you’re good to proceed. 

  1. Let’s import the necessary modules:
    Selenium with Python

    Importing necessary modules

    webdriver: This built-in Selenium package function drives the actions; it connects our script to the browser and can do all the actions we describe. 
  2. Create an object (every variable created in Python becomes an object) and add the path to the Chrome driver file as an attribute.

    Selenium with Python

    Create an object

    Use the command’ webdriver.Chrome()’. The location of the Chrome driver’s “exe” file must be specified in this command.

  3. After this, we can use the ‘driver.get()’ command to open any website.
    Selenium with Python

    Open any website


    Your browser should automatically open the site URL when you run the script.
  4. Add another attribute to print out the title of the webpage.

    Selenium with Python

    Print

    The output should be something like this.

    Selenium with Python

    Output

If you run into any issues, simply repeat the previous steps. 

(Tip: When executing any module, do not save the file with the module name; otherwise, a ‘circular import error’ may occur.)

So, this is how we connect Selenium, Python, and the web browser. Now, let’s run a basic test to see how we can alter various components of the product’s front-end.

Automated test: Selenium with Python

Now that we have all the prerequisites and have tested them to ensure they are working properly, we can begin working on the website’s components using Selenium with Python

Selenium provides a plethora of methods for interacting with HTML components. We are engaging with the search query here to provide input and test the keys. Any clickable elements (buttons, forms, pointers) on the webpage can interact with Selenium’s built-in functions. 

  1. First, import the required modules and functions to run the testing.
    Selenium with Python

    Import the required modules

  2. Assign the object to the web driver and provide the URL.
    Selenium with Python

    Assign the object

    It will load the webpage, and we can now interact with the elements using the “find element by*” function.
    In the method mentioned above, you can inspect and find the HTML element with which you want to interact.
  3. This will write or post whatever we want in that section.
    Selenium with Python

    search_field

  4. It will activate that section’s specified key (enter, search, or any other).

    Selenium with Python

    Activate the section’s specified key

As you can see, we searched for distinct elements (id, class) for each of our functions; Selenium gives various choices for interacting with items based on their nature.

However, using the “id” is encouraged because “id” is unique for each element. We can import the time package and add delays between the tasks to see the progression.

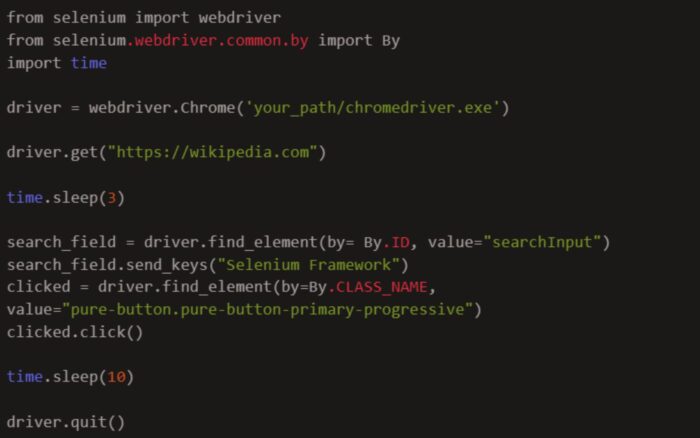
Here is an example of the complete code for our testing.

Selenium with Python

Selenium with Python: Example

It will navigate to the official page of Wikipedia, wait 3 seconds, then access the search box by its “id” and fill it with the text “Selenium Framework,” then identify the search button by its class name and click it using Selenium’s built-in function “click.”

We can also view the results on our terminal by using the print function.

  • The ability to harness the various modules and frameworks available in the Python environment is one of the primary benefits of utilizing Selenium with Python
  • Testers can use the PyTest framework to develop and execute Selenium tests or the Behave library to write tests in Gherkin syntax, which allows for smoother interaction with non-technical stakeholders. 
  • Another benefit of using Selenium with Python is its ease of integrating it with other tools and services. 

Testers can use Selenium with the Jenkins continuous integration platform to automatically test tests as part of their build process. They can use it in combination with cloud-based testing platforms to run tests on various browsers and operating systems.

Selenium with Python

Selenium with Python

Different types of Selenium automation testing

Let’s look at the different types of Selenium automation testing below. 

Regression testing

This test reruns already finished tests to check that codebase modifications have not generated new problems or regressions. 

As opposed to executing these tests manually, Selenium can automate the execution of a suite of regression tests.

Functional testing

This test ensures that an application functions properly and meets the requirements set out for it. 

Selenium can automate the execution of functional tests by mimicking user activities such as button clicks and form filling and ensuring that the application reacts as intended.

Integration testing

Integration testing ensures that different components of software programs work when linked together. 

Selenium can automate the execution of integration tests by simulating application usage involving several software components. 

Performance testing

Performance testing ensures that the software can manage the predicted load and amount of traffic. 

Selenium can perform performance testing by emulating many user activities and evaluating the application’s response time.

Cross-browser testing

The cross-browser test checks if an online application works properly on various web browsers. 

Selenium can organize the execution of tests on many browsers, guaranteeing that the application works in various browser environments.

Drawbacks of Selenium

  • Dealing with dynamic web pages, where the page layout or content may vary based on user interactions or other circumstances, is a common challenge for Selenium.

    Such testing can be difficult and time-consuming and may necessitate adopting additional tools or procedures to achieve complete coverage. 

  • Another concern with Selenium is the upkeep of test scripts. As the application under test evolves, the test scripts may need to be modified to keep up.

    It can be a substantial load for testers, especially if the test suite is extensive and the application is constantly updated.

End-note

Overall, Selenium is a useful tool for testing online applications, and Selenium with Python makes it particularly appealing to testers who prefer to work in a familiar language. 

Despite its shortcomings, Selenium is widely used in the business and has a large community of users and developers continually striving to improve and extend the software.

If you’re a software developer confident in your tech stack, Turing has a wide pool of remote opportunities for you. Click on the Apply for Jobs button and land your dream remote job today.

Join a network of the world's best developers and get long-term remote software jobs with better compensation and career growth.

Apply for Jobs

By Jan 19, 2023